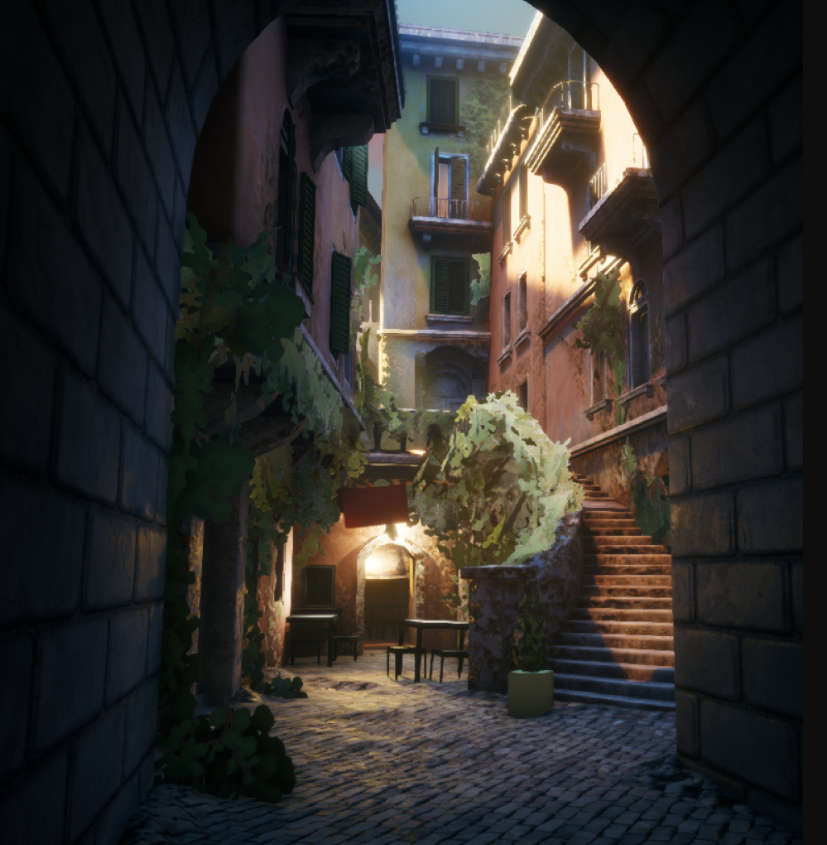
“Italian Alley” by Stijn van Gaal
The Mentor Coalition Mentee Stijn van Gaal talks about his experience with The Mentor Coalition, breaks down his beautiful Italian Alley scene, the value of a Mentorship and how that experience influenced his scene, outlook as an artist, and career path.

“This Mentorship has had a big impact on how I organize and profile myself, how I work and how I feel doing what I do, so without it I wouldn’t nearly be where I am now.”
Introduction
Hi, my name is Stijn van Gaal, a 3d environment artist just finishing school / getting into the industry.
Last year I felt kind of stuck in my work. Especially finding out what would elevate my portfolio to AAA junior/ intern level and how to go about doing that. Therefore, I made the decision to take a 6 month break from school and improve my skills before continuing to find an internship. Initially I was just going to do another environment piece as I normally do. However, in the first steps of this new project I felt stuck in the same routine, like improvement was constantly held back by lack of knowledge of certain workflow things like pacing, efficient and modular level art and staying consistent throughout the entire thing. It was always easy to go over the top in things like reference, creating crazy excel systems for planning or spending way too many hours on trivial stuff. Eventually I started to feel like I needed some external input on laying the ground work of a piece and carrying it through reliably instead of relying only on my own experiences / knowledge and spread out feedback from different people.
To aid me in this I thought maybe someone with AAA experience would be helpful to learn from. I started looking around and asking some people where to find mentorships. The Mentor Coalition came up quite quickly, and with the Mentors having proven experience in the industry and the premise being both clear and flexible I chose to take the World Building Mentorship from Christopher Radsby. What pushed me into choosing him was that besides working on AAA Ubisoft titles he also had an outspoken style in his personal work with some experimentality in it as well, which could come in useful when discussing stylistic and artistic choices.
The Mentorship Experience
When starting the Mentorship a few months later, I had a vague idea of what to make, but no clear plan yet. After having been to Florence on vacation the year before it was clear that I wanted to do an environment based on romantic Italy, with a lot of personal reference and it being something different mood wise than a mysterious forest. I thought it would be nice to focus on something I have personally experienced and have to say something about artistically.
The weekend before starting the Mentorship I started the first phase of the project. This seemed like a good idea, as doing this unguided would bring light to some issues in that part of the process during the first call. Looking back, this was definitely the case. My planning was too tight, I over-scoped a lot on the initial idea and the result would have been a lot different had I stuck to that way of working. This was clear after the first blog post I did. Chris advised me to slow down the first phase of the project. Instead of working 2 days on the blockout, I worked on it for a week. Doing this, and starting with simple shapes based on compositions I liked in my reference enabled me to create a composition that worked on its own, without all the detail, lighting and colors. In the end the composition largely stayed the same as it was the first week. Some elements have been changed and added to improve on the general idea for the composition, but from the first week onward I could use the basic composition and notes as a starting point. This way it felt more like a top-down approach. The basic idea was there, all the necessary elements existed, the rest was just adding detail and making it look finished.

During the first call we talked about a lot of stuff. After the introductions,we talked about scoping, setting proper priorities for a portfolio piece and looking at reference properly. One of the things that came up was that a lot of my reference was good as 'reference' but not as 'art reference' as in, I could copy elements from the reference images but they did not serve a proper function for finding composition, colors or general aesthetics. During the first week composition was a big part of the discussion. At the beginning I was kind of stubborn about the whole focusing on composition and general feel instead of the separate parts and techniques used. This ties in with the reference issues I had. I was scared of using the artistic elements from the reference I used. The composition, the colors, the atmosphere, it all felt off limits to me. However, looking at it another way made me realize that I chose a lot of the reference based on those exact things. It was stuff that inspired me, that made me imagine an end result.
We also discussed about the difference between classical art and game art and the pitfalls of creating a portfolio piece. How starting to work on an environment and figuring out the composition and general direction on the go could lead to pieces that are unbalanced and often uninteresting to look at. This really spoke to me. As a lover of classical arts I never thought about these things too much. Of course I did use some basic classical theory like color, composition and value hierarchies to a certain extent, but I never used those as a starting off point, just as guidelines.
Portfolio Piece As Art - Not A Level
So, one thing that Chris taught me that really inspired me is looking at a portfolio piece as a piece of art. It should theoretically be possible in a game setting, but creating something that is not limited to technicalities and optimization from the start can give you more artistic freedom and something more akin to art than to 'level art'. I was a little skeptical towards this as in my earlier projects I always wanted stuff to run well real time or even function as an in game environment. However, looking back, this might have been the best advice I could have gotten at that moment as the whole goal of the project changed. Focusing on artistic expression and the more 'classical' side of things like color, light and composition was always in the back of my mind, but relieving myself of worrying about the technical side of it too much enabled me to really put these things to practice some more. I'm not saying the technical side of it is not important, as during the Mentorship I learnt a lot of technical workflow stuff that sped up things and knowing how to make stuff run properly or work as a 3d space is still important within the context of an environment artist portfolio, however for this project setting myself free somewhat definitely helped. Instead of looking at trends and stuff people generally find cool at the moment I brainstormed about the stuff that inspires me personally, trying to think of a place I would like to be. This felt like a big risk at the time, as I often felt limited to making stuff other people like. However, just focusing on creating stuff I enjoy myself made for less stress of what the end result should be and look like and how people would react to it.
In the end there is no right or wrong here. Even though in this case I set the balance more towards the art side of things, my next big piece might be more directed towards technical experimentation or even level design. It's all about where you want to grow at the moment. I still incorporated all the lessons I learnt before and could apply without a large time investment, but most things were done for the purpose of making it look the way I want. Having the courage to do this came primarily from the discussions and talks I had with Chris, which is something I did not expect from the Mentorship.
Learning Technical Stuff From Chris
What I did expect, and got as well, was a lot of guidance on technicalities involved in creating a 3d environment piece (especially as I hadn't worked in UE4 before for a full piece). Chris set up an online depot with all kinds of information for his Mentees, from modularity and trim sheets to foliage. Besides that, we talked about a lot of technical stuff. Some stuff more artistically related, like using fovs, creating artistically directed light and some more technical, like light baking for modular pieces and planning for a texture atlas. These were generally a larger part of the calls, which was really helpful, as learning environment art by yourself or from sources all over the place can put you in a state where you don't know what technique to use in which situation and which sources of information you can trust. Being able to talk and discuss about all these things made me a lot more confident in the things I was trying to learn. Getting a general guidance in this made it easier to supplement the learning with good sources of information. Because it was nice to get direct information during the calls, but a lot of times I wanted to really get into it. Having the 'solutions' for the problem at hand to start with and researching deeper into the subject instead of the other way around made learning a lot easier and more directed. Instead of watching tutorials or finding general information on a subject I could find something that I found interesting or that could provide more specialized info.
One topic that we especially discussed was modularity, as this was something quite new to me. Chris directed me to a page on the depot, which had some good tips about making modularity look good. One of the tips was creating levels that were irregular in dimensions, like having the first floor be 4m high and other floors 3m. Besides that, we talked about using the reference images to pull dimensions and modular blocks from. This really helped, as it would ground stuff more and make the proportions more akin to real Italy than what I could imagine by myself. After the call I broke down some images and played around in Blender to see what would work in a modular kit. Playing around with the kit in both Blender and Unreal, creating more in the meantime I decided on the pieces that I would need for the final environment and created an excel sheet, ordering them by priority and adding proper naming conventions and file locations. When exporting the pieces I found out that exporting a whole kit while keeping the pivot centered in blender is kind of annoying, so here is where some technical stuff does come in handy again. I learned Python for Blender and created a plugin that would allow me to in 1 click set the pivot on the selected vertex and export the selected mesh with the correct naming and the pivot centered. This took some time and focus away from the project itself, but enhancing your workflow experience for future projects is certainly worth some investment.

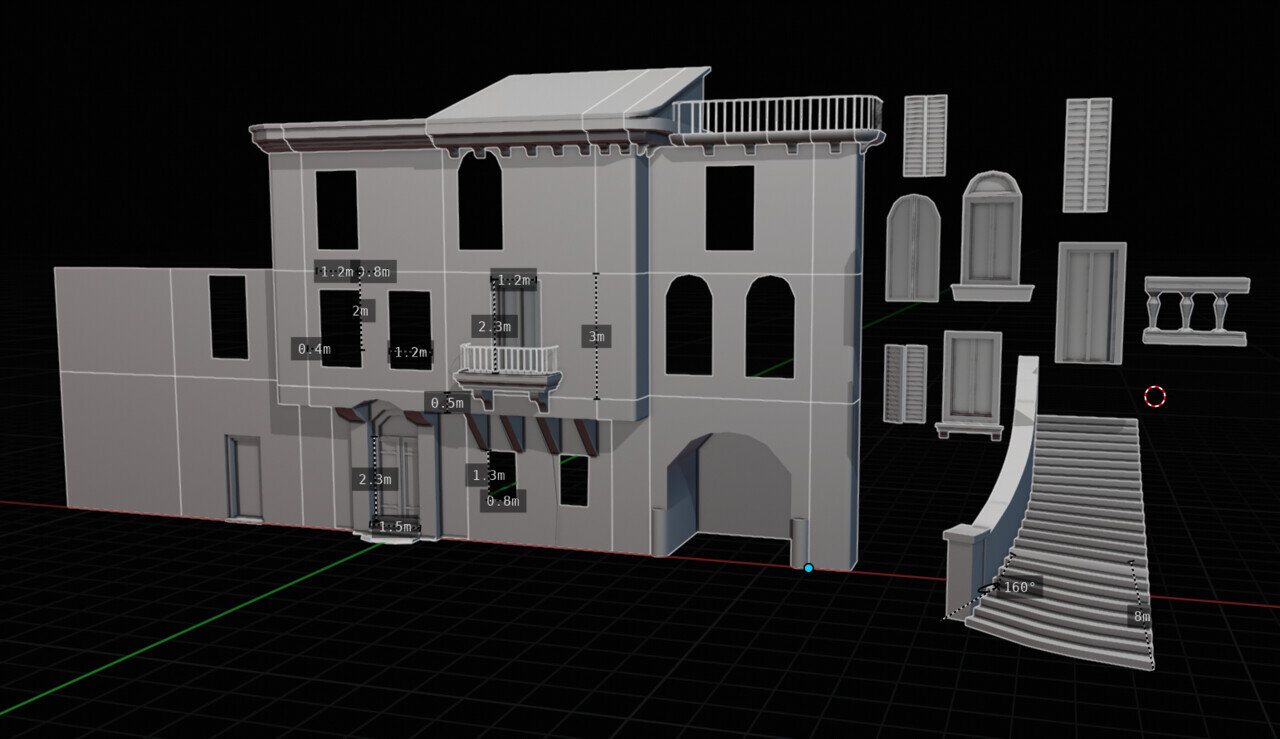
After creating the modular elements I recreated the blockout with these, keeping all the stuff Chris told me in mind. In Between the first and second call we talked about light falloff, trying out vertical composition and thinking ahead for material styles and lighting. As you can see the blockout stayed almost the same, mostly enhancing the compositional tightness, tightening the fov for a more painterly feel and slanting some of the buildings to make it feel more rustic and real.

The Second Mentorship Call
In the second call we talked about the modular stuff for a while. About how UE4 reacts to it and how to minimize light seams during baking. This was really useful stuff that would probably take me a while to find myself. After that, we talked about the feel of the space and how I could enhance the initial composition by using even more suggestive curves leading the eyes. Examples of this are the balcony on the right keeping the viewers eyes from going up and out of the frame, the clothing lines, doing the same thing and the stairs being curved more in order to exaggerate the spiral composition and space separation.
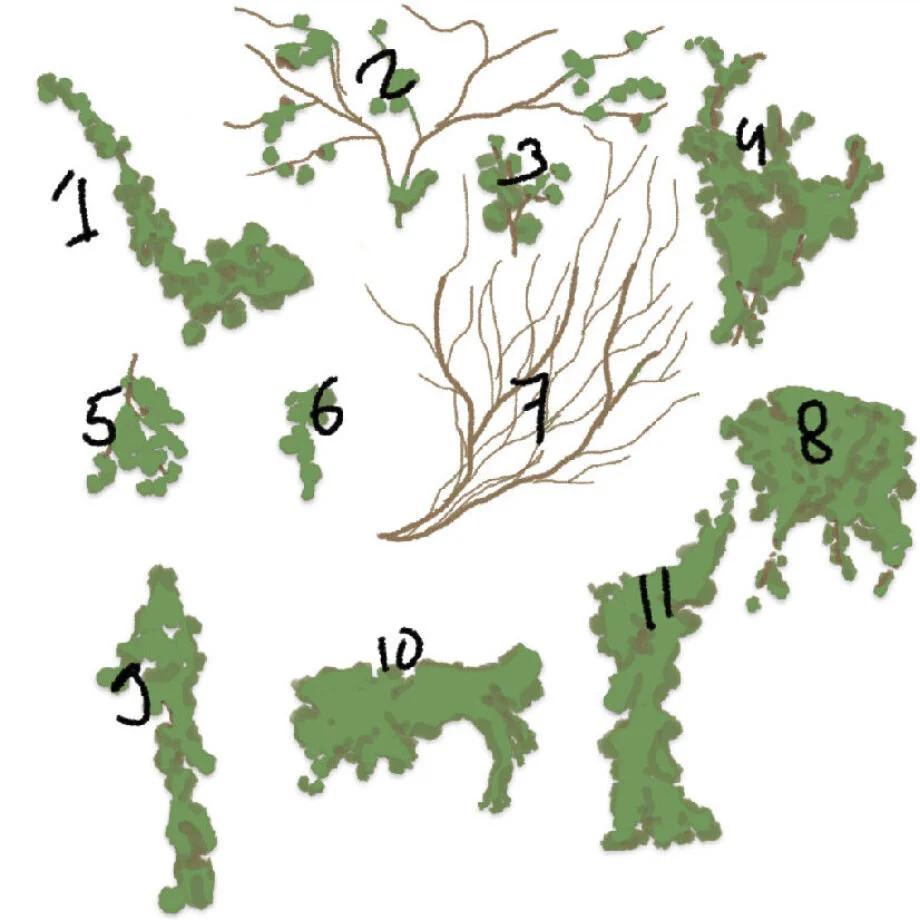
Another big part of the call was the ivy I wanted to incorporate into the scene. I had no clue on how to start creating foliage so dense. Chris taught me the trick he uses. Blocking out a photoshop texture atlas and creating placeholder meshes of ivy clumps. Doing this enabled me to direct the shapes and needs more than if I were to use a premade texture or spend time on making it look good from the start. After finding a configuration I was satisfied with I created some leaves to scatter by hand painting them in Photoshop and displacing a base mesh in Zbrush. For the base scattering I used the Blender particle system. However, this still made things feel flat, even with curved branches. To make it feel more fluffy, I layered each bigger branch (1,4,8,9,10,11) with some smaller branches and separate leaves (these would quickly lod out if I were to optimize it). Through Chris and reading some workflow of other people, I learned how to do it more efficiently (cheaper) as well, by creating a back plane with an opaque ivy texture and layering on top of that to minimize overdraw. However, for this piece I wanted to go for the better looking, albeit more expensive version, as this would allow for some nicer and fluffier looking AO and translucency
Working Between The Calls
In between the second and third call the most visual changes happened. This was for a part due to having more time as I was finishing a school project the first week, but for the most part it was due to having the base already done. From this point onward it was mostly about small experiments and seeing what I could add to make it stand out even more. The most important part that was missing for me was some life. I dwelled on what to add. Diners, someone shaking a rug in the window or lovers sitting on the stairs. However, due to wanting this piece to be 100% original, I decided to go for animals instead, making them a secondary, but integrated part of the environment. Thinking of animals I would like to encounter in a place like this I decided to add a cat and a bird. They both are really simple, modeled in a few hours in Zbrush, but placement and lighting nevertheless made them fit into the environment.
This was also the moment I started asking more feedback besides Chris, seeing what other people thought of it or thought could be improved. This was especially helpful for the arch material. Being somewhat non-caring about the performance, I made the material a 3 layered vertex painted material with high resolution displacement. I really liked the look of this, but someone pointed out that it felt kind of out of place, to which I agreed. It felt overly detailed for essentially a model that's there mostly for the contour, besides, it created some ugly stretching. Moreover, I wanted to see how it would work in a game environment. So I decided to ditch the displacement and use cubes that are sticking out (with the same texture mapping) for the bigger stones.
I did keep using Discord to communicate with Chris as well. He did some sketches, sent some reference and gave some tips about the stuff I was doing in between the calls.

Materials
Materials were not that big a focus of this project, but I still wanted to have fun with it. During the second call, we talked about slight stylization based on a 'Dishonored' kind of look. Hand painting the textures and leaving away any micro detail. I did not use a lot of roughness and I made the normals more mid-level than high-level noise. This was a really new workflow to me, but I kind of loved it. It was really nice to try out different textures and experimenting with different ways of extracting a normal from a stylized base color texture, for which I ultimately used Photoshop filters and Substance B2M. For the materials in-engine I created some variations for the walls. 2 colors, a sun bleached material and a dead ivy layered on the wall. The last one I did after Chris gave me the tip to make the ivy feel more layered. The dead ivy against the walls, some brown, dying ivy in-between and the fluffy green ivy on top. This really helped in making it feel part on the environment. More grown in to then placed on top of. For some more detail on the ivy and all other things, you can find more extensive breakdowns on my Artstation blog.


For the ground I just wanted to have some fun. I made a quick brick texture out of a flat hand painted texture and created a cracked version with sunken/ disappeared bricks here and there. I blended these based on the terrain slope. This required a high resolution terrain as the ground, but that definitely helped ground the scene some more. I could crack the ground where buildings intersected and make the ground feel slightly uneven to make it feel lived in. To expand on it even further I made the shader add a dithering dirt against the buildings and made it so I could paint the orientation to be either straight or 45 degrees, adding a trim of sorts to the left part of the ground, creating some more breakup.


“Having someone look at your entire process is something you can’t really get anywhere else”
The Final Call
The fourth and last call was 50% nitpicking and 50% general career advice. To finish off the project, a lot of small stuff needed to happen. Materials needed to be finalized, lighting needed to be baked properly, artifacts worked away, trims added and models finalized. We went back and forth on a lot of small stuff. It was a lot of fun breaking down what needed to be done for a real good polish. We threw ideas at each other and noted what stuck. Before this meeting I did the same on my own as well, something I did every few days. Taking a screenshot and tearing it apart, being really nit picky about everything I did. This allowed the calls to be more directed and focusing on issues that I know are at hand or things I want to learn. I would recommend anyone wanting to do a mentorship to do this as well. Preparation is definitely key. It makes the 2 hours each week even more worthwhile.
For the other half of the call we talked about more general stuff, where I asked a lot of questions about starting in the industry, finding an internship and how to continue my path from here. This included finished the project itself, as initially I planned to be done after week 4. Again, Chris told me to relax and take some more time, so I took another 9 days to finish off the project. Personal deadlines are important, but finding a balance is key. This allowed me to instead of being kind of satisfied with what I've made to be proud to have it look like it was feeling like in my head all along.

“Having a professional to direct questions towards and getting one on one time to direct the learning path to my own needs made it feel a lot more efficient than sitting in a classroom.”
Looking Back
Looking back 9 months later, I feel like I learned even more than I thought. A lot of the things that did not fully make sense back then are even clearer now, with some more experience. This mentorship was really useful for learning some technical tricks, but invaluable for learning about the way I work and how someone else sees the process. Learning to appreciate the basics has made me more mindful about all the work I do now. Doing a mentorship was a totally new way of learning for me. Having a professional to direct questions towards and getting one on one time to direct the learning path to my own needs made it feel a lot more efficient than sitting in a classroom. I could ask questions that were on my mind for a long time but I was not able to ask as I didn’t know who to ask them to. Having someone look at your entire process is something you can’t really get anywhere else. It opened my eyes to a lot of quirks in my workflow and mindset, something that would take me a long time to discover on my own. This mentorship was definitely an investment, money wise and time wise, but what I got back was 100% worth it. I learned more in 1 month than I normally do in a year and I landed an internship at an awesome company (Ubisoft Berlin). The last year has been really overwhelming. The project got a lot of love online, getting job offers left and right due to it and a lot of people have started me for asking advice and tips. I mostly told people that all I did was make something I loved making, work hard for it and be mindful of it, which are of course the main things. However, this Mentorship has had a big impact on how I organize and profile myself, how I work and how I feel doing what I do, so without it I wouldn’t nearly be where I am now.
“I learned more in 1 month than I normally do in a year and I landed an internship at an awesome company Ubisoft Berlin.”
For the future, I'm staying on the path I am on at the moment, hoping to keep learning, keep improving and mostly, keep enjoying. I might even take another Mentorship to expand my knowledge in some other directions. I have taken a break for a while with personal projects but am slowly starting up again, so stay tuned.
I hope that I gave someone some more insight in what taking a Mentorship is actually like and how I used the guidance within this project! Thanks for reading!